A Comprehensive Guide to Accessing Your Card Printer's Dashboard DS Range
Card printers have become important tools for various businesses and organisations in today's digital age. These devices help create identification cards, access cards, student cards, loyalty, membership, gift cards and more.
To harness the full potential of your DS Entrust card printers, it's crucial to access its printer dashboard, which provides essential insights and controls.
This comprehensive guide will walk you through the step-by-step process of accessing your printer dashboard.
Whether you've just installed the software or need a refresher, we've got you covered.
Check out our support video if you'd rather prefer to follow along.
Step 1: Navigating to the Control Panel
To access your card printer's dashboard, the first step is to open the Control Panel on your computer. The Control Panel serves as the gateway to various system settings and configurations.

Step 2: Selecting "View Devices and Printers"
Once in the Control Panel, look for the "View devices and printers" option. This choice allows you to manage and view all the devices connected to your computer, including your card printer.

Step 3: Finding Your XPS Card Printer
In the "Devices and Printers" window, you'll find a list of devices connected to your computer. Locate your XPS card printer in this list. left click on it to access the printer's properties.
Step 4: Accessing Printer Properties
Once you've selected your card printer, right-click on it to reveal a dropdown menu. From this menu, choose "Printer properties." This option will open a new window with printer-specific settings and information.

Step 5: Selecting the Port
In the "Printer Properties" window, navigate to the "Printer Status" tab. Here, you can find the printer's IP address.
Mine is: 169.254.1.1. Yours will be found next to the USB or Network, depending on how you connected your card printer.
Copy the IP address into your browser.
This IP address is essential for connecting to your card printer's dashboard.

Step 6: Accessing the Printer Dashboard
You can access your printer dashboard after noting the unique IP address above.
In most cases, the software installation will automatically direct you to the printer dashboard site online.
However, if it doesn't, you can enter the IP address into your web browser's address bar. Press "Enter," and you'll be taken to the printer dashboard login page.
Step 7: Logging In
At the login page, enter your personal login details. It's important to emphasise the need for safeguarding these login credentials. Store them securely to ensure you can log in whenever necessary.
By entering the login page, you may find that it will come up as not secure. You can click advanced and click enter portal safely. You will then be able to access this browser.
There will be no harm to your computer, it is just protocal.

Step 8: Exploring the Printer Dashboard
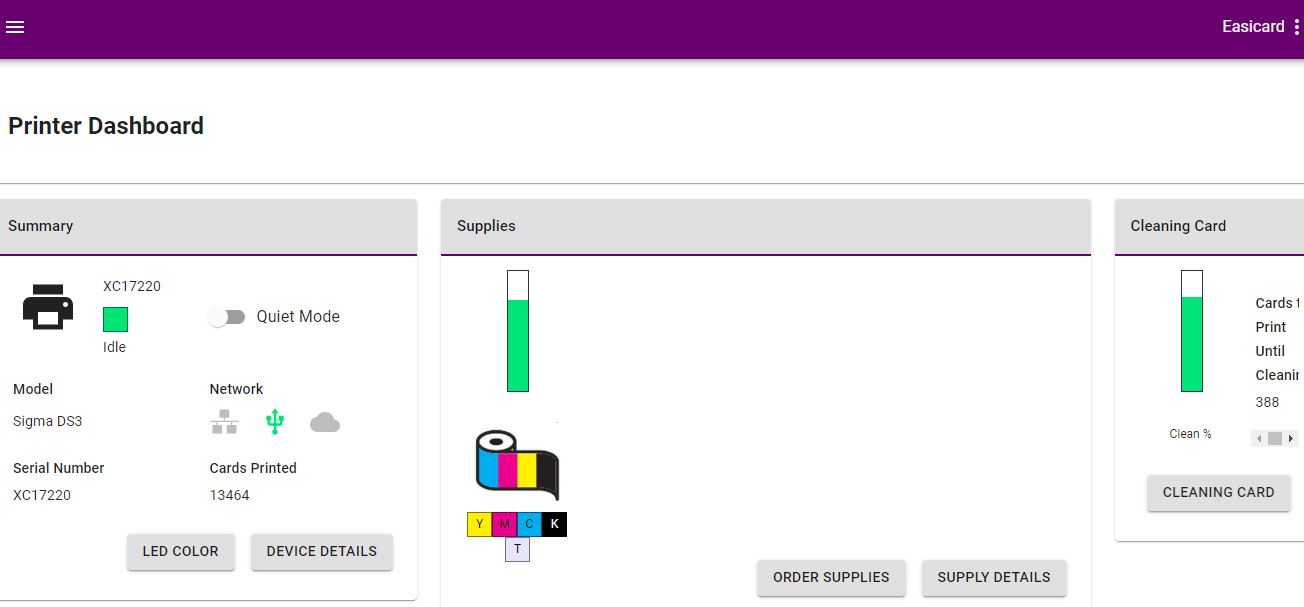
Once you've successfully logged in, you'll gain access to the printer dashboard. While we won't delve into every feature in detail in this guide, here's a brief overview of what you can expect to find on the main page:
- Remaining Card Prints: The dashboard displays the number of prints remaining before inserting a cleaning card. This feature helps you maintain print quality and cleanliness.
- Ribbon Usage: You can monitor the amount of ribbon used, ensuring that you change it when necessary to avoid printing disruptions.
- Quiet Mode: If you're working in a quiet office environment, you can switch your card printer to quiet mode directly from the dashboard.
- Connectivity Status: The dashboard provides information on how your card printer is connected, helping you troubleshoot any connection issues.
- Serial Number: Easily access your card printer's serial number, which can be crucial for tracking and maintenance purposes.
- No. of cards printed: Your device will let you know how many cards have been printed. This is a good indication of how your card printer is doing and when it needs renewal.
- Change LED Colour: You can easily change the colour of your card printer's LED light directly from your dashboard.

Step 9: Updating Firmware
Finally, the printer dashboard also offers the option to update the firmware of your card printer.
Scroll down on your printer dashboard and check fro firmware updates.
Firmware updates can bring improvements, fix issues, and enhance the overall performance of your card printer. Check for firmware updates periodically and apply them as needed.
Conclusion
Accessing the printer dashboard of your card printer is a fundamental aspect of managing and maintaining your card printing operations.
By following the simple steps outlined in this guide, you'll be able to tap into the full potential of your card printer. Whether you need to monitor consumables, adjust settings, or troubleshoot issues, the printer dashboard is your command center.
Remember to keep your login details safe and stay up-to-date with firmware updates to ensure your card printer runs smoothly and efficiently.
Your card printing processes are about to become more convenient and streamlined, thanks to your newfound knowledge of accessing the printer dashboard.
For more information, feel free to contact us.